Cardboard tombstones are always a part of Halloween, we all know that. But its existence does not end just there. We can use them as props during a drama presentation or whatever. Regardless of reasons, if you want to create three-dimensional cardboard tombstones, we can simply teach you how to create them.

Materials
- Cardboard boxes
- Sand or bricks
- Spray paint (gray, rustic umber and flat black)
- Newspaper
- Measuring tape
- Scissors
- Packing tape
- 3-inch stencils
- Decoupage glue
- Hot glue gun
Directions
- Plan, draw and cut your tombstone shapes.
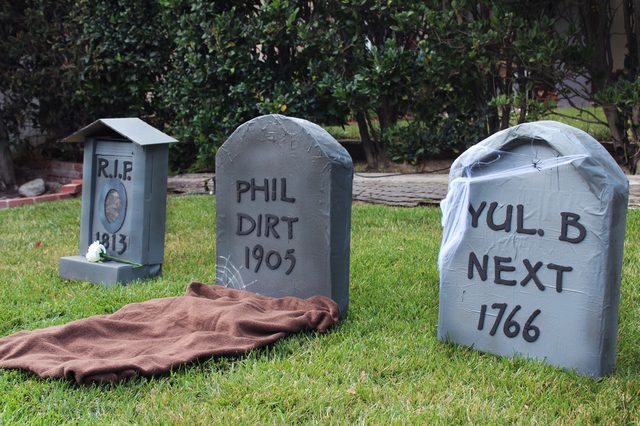
Begin with planning the size, shape and overall appearance of the tombstone. However, we are going to give you an example here—this one’s 27×20 inches in size. The classically popular tombstone has a curved top, so you can use a large bowl for the outline. Leave at least 3 inches of additional space at the bottom of the tombstone so you can fold it later. Cut out the tombstone and use it as a pattern for the other surface. Cut out the other tombstone surface so you can create a 3D effect.
- Create the support piece for your tombstone.
Make the support by cutting 32 pcs. of cardboard at 20×3 inches. Next, cut down the center of each piece by 1.5 inches. Take the pieces and slide the cuttings together, inserting them into each other to create an X or +. This should go between the two tombstone pieces you prepared in step 1 to support them.
- Tape the tombstone surfaces together.
Let the two tombstone pieces stand side by side with the extra three inches (bottom part) folded under each other. Tape the bottom part together using the packing tape.
- Make the sides of the tombstone.
Make the side pieces of the tombstone by cutting two cardboard strips, measuring from the bottom of the tombstone to the point where the top starts to curve by 3 inches wide. Tape the X-shaped support to one of the interior sides of the two tombstone surfaces. Now put the side pieces in the space between the two tombstone pieces to make a complete 3D tombstone package. Tape them to the two tombstone surfaces.
- Put weights inside the tombstone.
Fill in 2 sandwich plastic bags with sand and put them right inside the tombstone. If you don’t have sand, then you can make use of bricks so it will help the tombstone standing. Next, cut out a strip of cardboard 3×24 inches in size. This will be a curved top of the tombstone and tape this at the top of the tombstone, just right in between the two tombstone pieces.
- Decorate the tombstone with paper mache and paint.
Use the newspaper and decoupage glue to make a paper mache over the top of the tombstone and give it a rounded effect. Put about 3 layers of newspaper to give it a solid touch and let it dry completely for several hours.
Apply gray or dark gray spray pain to the tombstone for the first layer. For the second layer, spray a rustic umber textured spray paint. To render it with weathered look, sponge some flat black paint just around the edges.
- Make, cut and glue the letter cuttings on the tombstone.
Use three-inch stencils for the letter outlines to name the tombstone. Cut out the letters using a pair of scissors and spray them with flat black paint. Use glue to put the name ((of the dead) onto the tombstone.
- Put on finishing touches to the tombstone.
You can create a spiderweb effect using hot glue or cotton and some fake spiders as well. You can place a rose or level your tombstone up by putting a brown towel over some newspapers underneath to have that dug-up effect.